
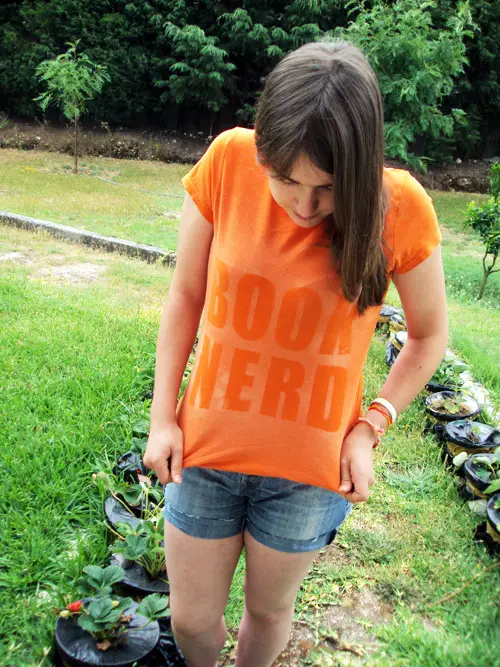
I was wearing this t-shirt in my first days of college. I wore it a lot but unfortunately it got stained, I liked the color and the fit but once it got stained I didn’t wear it anymore.
I couldn’t donate it because it was stained which meant that it would go to the trash, the fabric was still great so for a while the t-shirt stayed in my dresser waiting for me to revamp it. I was hoping I’d not have to put in the trash, I’m a big believer in using everything until the end and figuring out what to use them even at the end of their life.
Eventually I saw a couple of projects here and here of bleaching fabric with bleach and thought it’d be the perfect project for this t-shirt. The bleach would get rid of the stain and I’d have a cool new shirt or I wouldn’t like the result and would end up using the t-shirt as rags, both would have function so I got down to business.

As a huge fan of reading, I thought of making a statement t-shirt to profess my love for reading. I enjoy reading what other people statement’s shirts say. I don’t own too many of them (perhaps two including this one) but I should have more. How easy is to show your love or your opinion about something with just a shirt.
How to make your own statement t-shirt
1. Trace or draw your letters onto regular paper and arrange it on the shirt. Don’t use brand new paper, use written ready to be trashed paper for this or you can use old cereal boxes as well, no need to waste brand new paper. Other tutorials used duct tape or contact paper but I found that it wasn’t necessary.

2. Add your dyeing mix to a spray bottle. Mine was 1 part bleach for 2 parts water. I wanted to have more control in the final product so decided it’d be better to have a weaker mixture and wait more. Also it’s less probable to end up with holes in the shirt.
3. Put a cardboard between the front and the back of the shirt to avoid bleeding.
4. In a well ventilated area, preferably in the sun, shake the spray bottle and spray the mixture on the t-shirt.
5. Leave it in the sun until it reaches the desired color.
6. Rinse it in water immediately to stop the dye and wash it.
7. Admire your creation!
It looks great doesn’t it? And I’m super happy to be able to wear this as a book lover! Please let me know in the comment section if you made this using this tutorial, I’d love to know how it went.
(It’s 2019, 8 years after I made this t-shirt and I still wear this t-shirt often!)

13 comments
Caaaath!
Tudo bem, menina?
Não sei se você lembra de mim e tal, mas eu vou refrescar a sua memória – pelo menos um pouco.
Sou a Malluh, atualmente conhecida como Malu Dini. Eu fazia dolls com você, tanto que me ensinou a fazer vetorização/colorização! <3
Dou graças a você muita coisa que aprendi no photoshop *o*
Eu tinha um subdominio com o seu domínio também…
Espero que eu não tenha passado por esquecida =(
Enfim.
Sonhei com você hoje, sonhei que tinha falado contigo depois de muito tempo. Bateu uma nostalgia e eu fui correndo procurar por você assim que acordei <3 E te achei. Ainda bem que o blog ainda tá no ar! *O* Vou fuçar mais por aqui hehehe.
Tem facebook? Msn? gostaria de voltar a ter contato com você.
Beijão!
Malu Dini
love this project! i want to try it! 🙂
Love this, I think I’ll introduce it to my fellow campers this weekend.. Just curious though, did the cleach leak when you washed the t-shirt afterwards?
No, I rinsed it after applying the bleach and when I washed (in the washing machine) it the bleach didn’t leak 🙂
This is so cute! The graduate student organization I’m in is actually thinking of using this methods for our t-shirts! One question, though: what kind of paper did you use to make your stencils?
I used regular printer paper, some use contact paper but since I didn’t want to have too much trouble I used regular paper and it came out just fine 🙂 As long as you don’t have wind where you’re doing it you’ll be fine. If you end up doing some thing with this I’d love to see it!
I used chipboard letters/shapes that I bought at a craft store for about $3. They lay heavier, plus you can reuse them. Love this idea! My kids are making shirts today!
Thank you for this. I bought some red t-shirts a few years ago with the intention of marking them with an non-profit’s name. Stenciling seemed like a lot of work and I never got at it, however.
This looks a lot easier!
[…] (via Book Nerd | Dreamy Colours) […]
[…] got my inspiration from Cath at Dreamy Colours but next time I probably should actually READ the post and not just look at the pictures. 🙂 I […]
LOVE IT!!
This is such a fun project! I love it!
Great idea. I’ve been wanting to dye some stained shirts but it seemed like such a big deal. This is totally doable. Thanks for sharing.
Besos, Sarah
Blogger at Journeys of The Zoo
Finding Humour in Everyday Life